Don't google this stitch name - you may not have any success :)
Coz, Iam the one who came up with the name.
After I attempted this particular stitch, I did try looking around with various keywords, but met with zero success.May be one of you could help me out. Do leave a comment or mail me if you know the stitch name,otherwise from today on it'll be Deepa's very own fur stitch ;)
The credit for this stitch goes to one of my friends, Nisha, who had come to learn BE. She told me about a corded stitch used for filling strawberries.This method is infact Raised chain band/raised chain stitch
 The above pic is of couple of petals filled in with that method.I changed the method a bit and came up with Fur stitch.The texture of both the stitches are different. Raised chain band gives a flat texture,while Fur stitch gives a...er...furry texture.
I'll now show you the new block on the bedlinen with the new stitch. Ta..da..da.. here it is
 Looks different ,right? Or is it my short sight? The tiny red roses are stitched with Chain Stitch using this tutorial of mine.
At the first sight, it resembled teddy bear's fur.Infact, that was my first reaction when I glanced at the completed flower - ha, I could use this for filling up a teddy bear.Not sure how practical it would be, especially for large teddy bears.
 Step 2 : Come up at the top. By top I mean the bar/cord near the center of the flower. Instead of coming up directly at the top , I took a small stitch in between and then brought the thread up. You can see the stitch just above the third cord from the bottom. Make sure the needle doesn't pierce any of the cords when you do this.

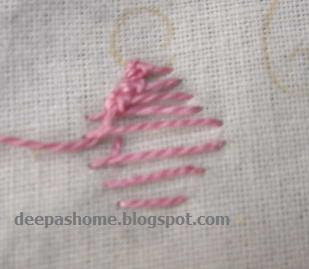
Step 3 : The first knot : Insert the needle under the cord, without piercing the fabric. Keep the the thread under the needle (similar to detached buttonhole) and pull to form the first knot.
 You'll get a knot as shown in the pic below :
Step 4 : The second knot : Now insert the needle in the reverse ( from top to bottom) at the same place,in the same manner with the thread under the needle to form the second knot.
Note : I've not shown the thread under the needle in the pic.But it has to be done.
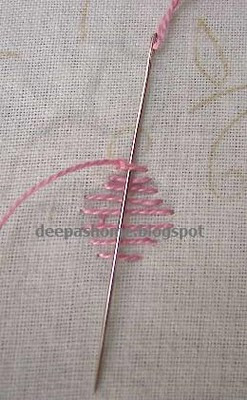

Step 5 : After completing both the knots on the same cord (see the image just above), go under next bar without piercing the fabric.
 The above pic is of Step 5. I've made three knots and have taken the thread under the fourth cord .
Repeat from Step 3 onwards to cover one vertical line. As you complete the knot at the last cord, go down and then come up again at the top.
 Here's a close up of the furry beauty.
Coz, Iam the one who came up with the name.
After I attempted this particular stitch, I did try looking around with various keywords, but met with zero success.May be one of you could help me out. Do leave a comment or mail me if you know the stitch name,otherwise from today on it'll be Deepa's very own fur stitch ;)
The credit for this stitch goes to one of my friends, Nisha, who had come to learn BE. She told me about a corded stitch used for filling strawberries.This method is infact Raised chain band/raised chain stitch
 The above pic is of couple of petals filled in with that method.I changed the method a bit and came up with Fur stitch.The texture of both the stitches are different. Raised chain band gives a flat texture,while Fur stitch gives a...er...furry texture.
I'll now show you the new block on the bedlinen with the new stitch. Ta..da..da.. here it is
 Looks different ,right? Or is it my short sight? The tiny red roses are stitched with Chain Stitch using this tutorial of mine.
At the first sight, it resembled teddy bear's fur.Infact, that was my first reaction when I glanced at the completed flower - ha, I could use this for filling up a teddy bear.Not sure how practical it would be, especially for large teddy bears.
Whether my own or not, here's the step by step tutorial for Fur Stitch.
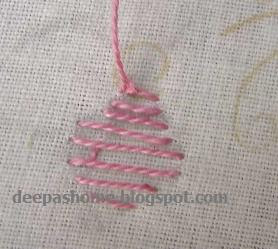
Step 1 : Make straight stitches across the area to be filled up.In this stitch we make horizontal bars and fill it up vertically.
Step 1 : Make straight stitches across the area to be filled up.In this stitch we make horizontal bars and fill it up vertically.
 Step 2 : Come up at the top. By top I mean the bar/cord near the center of the flower. Instead of coming up directly at the top , I took a small stitch in between and then brought the thread up. You can see the stitch just above the third cord from the bottom. Make sure the needle doesn't pierce any of the cords when you do this.
Step 3 : The first knot : Insert the needle under the cord, without piercing the fabric. Keep the the thread under the needle (similar to detached buttonhole) and pull to form the first knot.
 You'll get a knot as shown in the pic below :
Step 4 : The second knot : Now insert the needle in the reverse ( from top to bottom) at the same place,in the same manner with the thread under the needle to form the second knot.
Note : I've not shown the thread under the needle in the pic.But it has to be done.


Step 5 : After completing both the knots on the same cord (see the image just above), go under next bar without piercing the fabric.
 The above pic is of Step 5. I've made three knots and have taken the thread under the fourth cord .
Repeat from Step 3 onwards to cover one vertical line. As you complete the knot at the last cord, go down and then come up again at the top.
 Here's a close up of the furry beauty.
So that's it. I hope I've contributed something good enough for all of you try out in the coming days. By the way, one more block of the embroidered bedlinen is done. I've already completed another of the smaller blocks and have started one of the largest flowers . The pics are reserved for the next post :)
Here's the complete list of all the links related to this project of mine .
Embroidered Bedlinen - A study of filling techniques in Hand Embroidery
Love,luck and sunshine,
Deepa
Here's the complete list of all the links related to this project of mine .
Embroidered Bedlinen - A study of filling techniques in Hand Embroidery
Love,luck and sunshine,
Deepa
It gives a lovely texture, and I love the strawberries on the block
ReplyDeleteHey Deepa stich looks beautiful...:)
ReplyDeletebit similarity with raised chain bands rt!!
Thank you Jane,but strawberries are not part of this block. I stitched those on a separate piece.
ReplyDeleteYes, Lakshmi. The stitch is similar to raised chain band. Infact the red one,which Nisha showed is raised chain band.My Fur stitch is a slight variation. You can see that the texture is little different.
Deepa, this is superb! Your tutorial makes it so easy! I love it! It is wonderful that you have used your imagination to come up with something a little different that has turned out so pretty.
ReplyDeletewow deepa, this stitch looks very good
ReplyDeleteohhh i'm going to try that one!
ReplyDeleteand of course you can take credit as the inventor.
Deepa's furry stitch, just add that as a tag and go to google. you'll be surprised.
Great tutorial Deepa..lovely texture..
ReplyDeletegreat deepa.. its beautiful..
ReplyDeleteI'm definitely going to try this...Good invent..keep it up..
ReplyDeleteim all excited..u know why..ur new stitch is really going to be great stitch to use in indian embroidery..i just tried the stitch with 4 strands of silk thread (in my current project)..its looking damn cute..:)...may the procedure slightly changed i think..
ReplyDeletewow...that looks similar to raised chain band stitch...superb sttich for filling
ReplyDeleteThis is a lovely invention!
ReplyDeletefur stitch... no google but googly woogly woosh to touch;)
ReplyDeletebeautiful block and a great tutorial ;).
Deepa
ReplyDeleteThat is very pretty, I like the effect. You said it's on a bed linen. Would that be a sheet hem or pillow case? Just curious, and wondering how it would launder.
Great work
Linda
Thank you very much for your valued tutorial. I was undecided as to which stitches to use for a block on 'choli'. Now I've got the answer.I used the raised chain band and it's coming out to be a perfect stitch. Thank you for being so inspirational.
ReplyDeleteThank you for the kind words,Sujatha. Would like to see the choli once it is done :)
ReplyDeleteDeepa,.. it is very nice of you to give us a tutorial of that work. I will use it, as I like it very much.Not complicated to do. it is a very nice piece of embroidery that you have done.
ReplyDeleteLaurette
Deepa, This looks really nice. I use a similar idea for the trunks of trees but instead of the chain stitch I use raised stem stitch. Have a look at my w.a. wattle. This stitch has a wide range of uses. I am thinking interpretating coral if I have your permission
ReplyDeleteWill put up another of my meadow series pictures for you to see the effects of the raised stem stitch
shirley
Deepa,I am great admirer of ur work!! All r excellent.They r very informative!! can u tell me which thread do u use when do embroider in sarees or kurties?
ReplyDeleteregards,
Hi Viraja,
ReplyDeleteThe type of thread depends on two factors - the type of cloth and the look you want. For simple look use cotton strands.But usually for sarees and kurtis silk threads could be used.For delicate work use one or two strands and for heavy work go for 3 or 4 strands.
Love,
Deepa
This is a good stitch, i must use it some where.Your work with this stitch is looking vry good.
ReplyDelete