Of late,I've been trying to get myself better acquainted with the Indian embroidery techniques-Kamal Kadai is one of them. This style of embroidery is native to the state of AndhraPradesh in India.
A few months back,a friend of mine was embroidering her sari using this method. I learnt the basics from her,but did not practice on cloth.Yesterday,I finally had the inclination to attempt it.Here's the step by step :

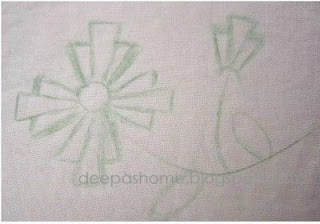
Draw the picture of the flower.Note the way the flower is drawn.This style is the speciality of Kamal kadai.The petals in this case has two levels.You can increase the number of levels if needed.

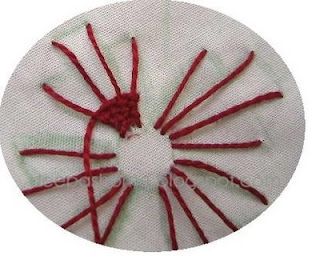
To form the base of the embroidery,straight stitch the petals as shown above.

Start from the bottom corner of a petal and weave the thread through the foundation lines-over,under,over ,under and so on without picking the fabric.Use a tapestry needle .(I was too lazy to change into one :)) ) And make sure the thread is long enough to cover a single petal.

Here's the partly weaved petal. Each line should be woven close to the previous one.

Finally,the picture you've been waiting for...
That's about it for now.
Love,Luck and Sunshine,
Deepa
Good pattern and Idea, Deepa!
ReplyDeleteare you on Sttichin fingers?
Kind regards
from Anne
France
http://quilt007.free.fr
Deepa thank you for showing your lovely flower and how it is stitched. I am fascinated by embroideries from other regions and cultures. I know that there are a great many different types of embroidery from India and Kamal kadai is one that I have not seen before.
ReplyDeleteCA
This is absolutely beautiful, very effective
ReplyDeleteThat really looks pretty! I've never heard of this technique before. Thanks for showing us how you did it, Deepa. I'd like to try it some time.
ReplyDeleteFound you through stitchin fingers, think these flowers are lovely.
ReplyDeletethanks for showing this, must try it out asap :-) going over to check out your page on stitchin fingers
ReplyDeletehi,great job,of explaining it so nicely.I have question about its pronunciation in the Indian Languages.Does the word 'KADAI' have a long sound in it,if so where.I knew of it as Navarr work,navar being the name of the thread or the place it is manufactured.I came across my friends from Andhra doing it.
ReplyDeleteHi Deepa,
ReplyDeleteThank you very much for fulfilling my quest for learning this work. It is so easy after having gone through the pictorial steps.
Can you provide me some tips on how many strands of threads have to be used? And any other tips that produce neat work.
Referring to Sita's comments, I think Kadai work might be called Navar work because it is similar to the way they do on the cots. They have a long flat rope and the winding around the cot is done in the same way as it is done in Kadai Work.
Thank you,Sushma.
ReplyDeleteAs for the thread for Kamal kadai, you need to buy the kadai thread you get in market or use anchor pearl cotton. You should not split the threads.
Take your time and weave slowly.Neither too tight nor too loose.
Hope this helps,
Deepa
Good for people to know.
ReplyDeleteHi Deepa,
ReplyDeletevery beautiful indeed , i have a doubt , after weaving each line does it need to be ended by fastening the fabric .
Roshini
Hi Roshini,
ReplyDeleteThanks!!
No, you needn't go under the fabric for each line.You just have to turn around and weave.
You need to pierce the fabric only twice - once for coming up and second time for going down at the end of the petal.
Deepa
Deepa, very well explained tutorial...thank you for sharing
ReplyDeleteDeepa, I stepped across your blog just as I was looking for various Brazilian embroidery designs. Took note of it to come back to again.
ReplyDeleteMy BE teacher then gave me an Indian book of bead designs and at the back they had a list of the book names that they had in their series and I noticed there were quite a few different names such as the kamal kadai and chemanthy and even Lavangam :) Came back to your blog and found all of them and tried it all - JUST SUPERB! Loved your tutorials, they are clear and so easy to follow - thank you so much Deepa! :D
Good job deepa your photos are very clear. thanks for the detailed work.Do you have designs for this which we can download?.
ReplyDeletethanks
Gayatri
I've just discovered this blog and have spent quite a few minutes enjoying the pictures and getting enthused about Brazilian embroidery again. Marlene
ReplyDeletehi deepa,
ReplyDeletethanx a lot for the tutorial.itz very easy to understand .I've tried out this embroidery and it comes out well & the credit goes to U.Hats off to you deepa.I'll post U the pattern soon. have tried chemanthi work too.But itz not that good.might be need some experience for that.Thank you once again for the nice work.
luv,Gowri.
Thank u for the wonderful tutorials..so much better than the ones i've looked at till now...i'm a beginner with a lot of enthu but little guidance..thanks !
ReplyDeleteDeepa, what is the thread used for this type of embroidery. Is it cone thread or silk thread.
ReplyDeleteHi Anon,
ReplyDeletePrimarily Kamal kadai is done with cone thread or anchor perl cotton. That way it is easier to weave.
Deepa
Deepa,
ReplyDeleteI have been searching for a name for this embroidery. Someone from the Hand Embroidery Network gave me the name and as a result I came up with your blog.
My mother's friend showed her how to do this, only it was done with a plastic grid for outline and then beads. I learned it with some friends, then promptly forgot how to do it.
Have you seen it done this way? The shape is an elongated diamond. I would download a pic to you if I knew how to send it here.
Many thanks for your tutorial!
Linda
Linda,
ReplyDeleteYou can mail me the pic at the mail id given just under the title of the blog.I would love to see the technique mentioned by you.
Regards,
Deepa
hi deepa
ReplyDeletei have been following your blog for some time now and enjoy watching your embroidery.
today i came across your kamal stitch and i really like this stitch. i would love to try it out.
many thanks and keep up the good work.
Deepa,
ReplyDeleteIs Kamal Kadai an Indian stitch or Western? .Recently I found an interesting website futurechristianhomemakers.com.Go to the link Gingham museum and you will find a collection of beautiful gingham embroidery/chicken scratch pattern on apron.In that collection I saw kamal - kadai stich used in one pattern.It was so surprising for me because I thought this stitch was Indian.Wonder how come Amish people got it??
Jisha,
ReplyDeleteIn west,Kamal Kadai is known by another name - Teneriffe. Have a look at this post of mine. You'll get some links there.
http://deepashome.blogspot.com/2008/08/kamal-kadai-another-possible-example.html
Conclusion : "earth is round" ;)
Muito lindo!!!!
ReplyDeleteAracy, Brasil
deepa , amei teu blog...
ReplyDeleteadoro bordados.
follow me!!!
bjs
thanks deepa...i really like dis stitch.
ReplyDeletei vl definately try it out.
i just loved ur work..awesome..i m also into embroideries..but b4 ur work i feel mine is nothing...there is so much to learn from u,...thanks so much for the tutorials..
ReplyDeleteAmei o teu bordado em kamal, estou tentando bordar, parabéns, um abç.
ReplyDeleteI like the Kadai kamal work. Can it be done with ordinary silk thread or it needs a special thread. Please let me know. I want to try it on my suit.
ReplyDeleteHi Anon,
ReplyDeleteI have answered this in one of the previous comments..
Please check out,
Deepa
Olá querida
ReplyDeleteHá tempos buscava um passo a passo para poder aprender este pontop, e o seu está maravilhoso.
Obrigada
Jaciara
Brasil
Please add Facebook badge. If you have FB Fan page then add share this feature.
ReplyDeletehi..dear..its awsome...n would like to learn more...i am much interseted in doing hand embroidery...can i contact you...
ReplyDeleteAdorei seu blog e já estou a lhe seguir.
ReplyDeleteVenha me conhecer.
Um abraço.
This is beautiful, thank you for the tutorial and the quick tip about where this style of embroidery comes from :)
ReplyDeleteThank you so much my dear friend for sharing your knowledge with us.
ReplyDelete