Hi everyone,
Since there are a lot of pictures, I've divided the tutorial into two parts. In Part 1 I will teach the frame and in Part 2 I will show the interlacing.
Shown below is the pattern diagram. I've numbered each corner in the order of stitching. If you look at the picture, you'll find that there are three boxes (1 to 8, 9 to 16 and 17 to 24)

 I've used all the six strands of anchor stranded cotton for the stitching. 6 strands gives a nice filled look to the pattern. But it is entirely your choice.
Kutch work is essentially weaving and interlacing. The point that you need to remember here is that in weaving we always have to pass the threads in the over and under sequence.
Let us start.

Step 2 : Go down at 2 and come up at 3. Again note that I do not go down at the exact corners. You can imagine that the sides of the squares are extended a bit.

Step 3 : Go down at 4 and come up at 5.

 Step 5 : Follow the same logic from 7 to 8. Go down at 8 and you'll get the first rectangle.

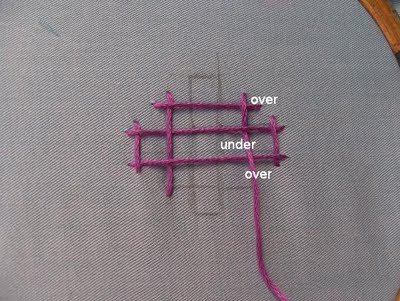
 Step 7: Weave in the below mentioned sequence.
 Step 8 : Go down at 10 and come up at 11.
 Step 9: Go down at 12 and come up at 13
 Step 10 : To go to 14, repeat the weaving sequence.
 Step 11 : Come up at 15 and go across to 16. The square is complete. Come up at 17 to start the next rectangle.
 Step 12 : Weave across to 18 and come up at 19. Go across to 20 and come up at 21.

Step 13 : Weave to 22 and come up at 23. Complete the rectangle by going across to 24

I'll be posting the pictures of interlacing in the next post.
Till then,
Love,luck and sunshine,
Deepa
For all those who wanted to know how the kutch work pattern with mirror was stitched,here's the tutorial. I have tried to show most of the steps,but since this pattern is slightly different from the usual,you may have to put your thinking cap on and use a little bit of your logic too.
Oh, and one more thing - Iam not showing the mirror fixing here.Once you learn the stitching part, you can just tack the mirror down in the middle of the pattern and do the weaving and interlacing as usual.
Oh, and one more thing - Iam not showing the mirror fixing here.Once you learn the stitching part, you can just tack the mirror down in the middle of the pattern and do the weaving and interlacing as usual.
Since there are a lot of pictures, I've divided the tutorial into two parts. In Part 1 I will teach the frame and in Part 2 I will show the interlacing.
Shown below is the pattern diagram. I've numbered each corner in the order of stitching. If you look at the picture, you'll find that there are three boxes (1 to 8, 9 to 16 and 17 to 24)

 I've used all the six strands of anchor stranded cotton for the stitching. 6 strands gives a nice filled look to the pattern. But it is entirely your choice.
Kutch work is essentially weaving and interlacing. The point that you need to remember here is that in weaving we always have to pass the threads in the over and under sequence.
Let us start.
Step 1 : Come up at point 1 as shown in the picture below.You can see that I've not come up at the exact corner of the square,instead it is slightly below the actual corner of the square.
I've used the diagram for comparison and I've also marked the relevant points.
I've used the diagram for comparison and I've also marked the relevant points.

Step 2 : Go down at 2 and come up at 3. Again note that I do not go down at the exact corners. You can imagine that the sides of the squares are extended a bit.

Step 3 : Go down at 4 and come up at 5.

Step 4 : This is where the weaving logic starts. From 5 ,you have to go to 6 and come up at 7. Note the horizontal thread marked with black arrow . It went over the thread from 1 to 2 ,so its sequence will be as shown in the picture below.
 Step 5 : Follow the same logic from 7 to 8. Go down at 8 and you'll get the first rectangle.
Step 6 : Now come up at point 9. To go to 10 ,you have to weave through the existing threads. Have a look at the horizontal thread marked with black. It is passing under the thread from 1 to 2 (first step) . So now it should pass over the thread from 9 to 10.
 Step 7: Weave in the below mentioned sequence.
 Step 8 : Go down at 10 and come up at 11.
 Step 9: Go down at 12 and come up at 13
 Step 10 : To go to 14, repeat the weaving sequence.
 Step 11 : Come up at 15 and go across to 16. The square is complete. Come up at 17 to start the next rectangle.
 Step 12 : Weave across to 18 and come up at 19. Go across to 20 and come up at 21.
Step 13 : Weave to 22 and come up at 23. Complete the rectangle by going across to 24
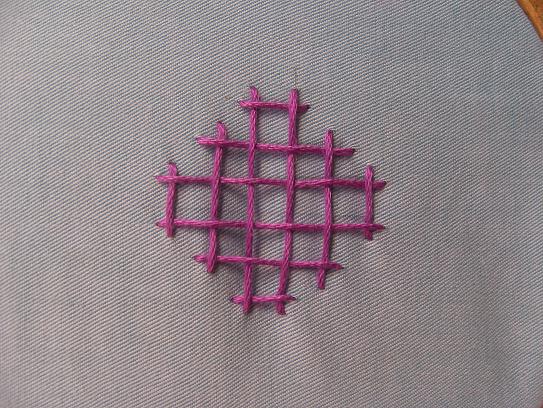
This completes the basic frame for this particular pattern. I hope the explanation is clear. I've not learnt Kutch work and this pattern has been worked out entirely by me. Hence I am not sure if I am breaking any basic rule of this form of embroidery. If I've gone wrong somewhere please do let me know.
I'll be posting the pictures of interlacing in the next post.
Till then,
Love,luck and sunshine,
Deepa
Thanks for sharing this, Deepa. It looks very interesting. I await part 2.
ReplyDeleteThanks, Deepa! I've done shisha the traditional way, but will have to try this one sometime.
ReplyDeleteThanks for doing this tutorial! It looks very easy so far. I hope to find the time to give it a try soon.
ReplyDeleteDeepa you are a genious! Thanks a lot, I will try this.
ReplyDeletenice tutorial
ReplyDeletecool! thanks. if you're breaking any rule or convention, well broken.
ReplyDeleteHi Deepa
ReplyDeleteThis Kutch work always fascinated me but i don't know why i am scared to try it but after seeing you tute. i think i'll give it a try. Thanks for it.
You have done a really nice job of showing how to do this stitch. I'm going to give it a try. Thanks.
ReplyDeleteI want to be at home for printing this lesson!!! Thanks for sharing it!!!
ReplyDeleteexcellent explanation
ReplyDeleteNicely explained,Thank u for sharing
ReplyDeleteHi deepa,
ReplyDeleteiam regular visitor to your blog. tku for kutch turorials.
nalini
I've bookmarked your blog and read your blog regularly fantastic, men!
ReplyDeleteHai sister,
ReplyDeletei am regular silient visitor to ur blog, finally give up 2 write u. No words 2 comment, 4 u keep on encouraging people like me to do more embroideries. Just i was keep on searching 4 more patterns in Kutch work through Google but cant find and finally, i thank u 4 timely help thk u sooooooo much.
Could u help me with more patterns. Definitely i will blog u again with my project. May take time!
hi deepa,
ReplyDeletethank you for the tutorial.
good one.lalitha
Lovely... Thank you for tutorial :D
ReplyDeleteHi Deepa,
ReplyDeleteExcellent tutorial. I will try it soon.
prabha
thank you so much! I'm an absolute beginner but following your instructions step by step I was actually able to do it. I thank you gratefully.
ReplyDeleteGreetings from Mexico City!
Dear Deepa,
ReplyDeleteKutchwork shisha tutorial you have explained so well. With your lesson anyone can do this. Appreciated and special thanks for this lesson. I will wait till you post next lesson.
Warm regards
Viji.
Nice tutorial! wish I could try this some time.. I have no formal knowledge in embroidery...
ReplyDeletehi deepa. thanks for the tute. someone mentioned that there is a bengal kutchwork and another kerala kutchwork. could you please clarify. thanks a lot.
ReplyDeleterevathi
Thank you for posting this. I had commented on one of your other posts as well. Do you continue to do kutch embroidery? Would like to connect. You can reach me at sriharielectric@gmail.com
ReplyDeleteHi u r amazing the way you thoroughly do this all is loveable.thank u so much
ReplyDeleteSimply adored your method of teaching it. It's very useful.
ReplyDelete